- Searching (and tab-completion) of all email addresses (via
ldapsearch) - Viewing Exchange calendar invitations
- Showing unread email count in your
tmuxstatus line
I lasted longer than I would expect, but my compliance budget finally ran out when it came to using Outlook for my work email. I’ve recently made the switch to Mutt and, so far, I’m enjoying the experience.
Given that my entire work setup consists of a web-browser and a fullscreen
terminal with an SSH connection to a Linux machine running tmux it seemed
a bit heavyweight to maintain a Windows VM just for using my corporate email.
Enter, Mutt:
What’s not covered here
Every hacker and his dog have written a blog on configuring Mutt so I’m not going to repeat all the great effort that’s already been expended. Instead I’m going to look at a few home comforts I’ve cooked up to make my life a bit easier. So here’s what I’m not going to cover:
- Setting up
muttfrom the ground up and configuring for usability - Using
mbsyncto sync your mail for offline browsing - Using
notmuchfor lightning-fast searching of mail
If you’re interested in getting to grips with these things I would highly recommend Steve Losh’s brilliant The Homely Mutt post.
What is covered here
- Searching (and tab-completion) of all email addresses (via
ldapsearch) - Viewing Exchange calendar invitations
- Showing unread email count in your
tmuxstatus line
Tab-completion (and searching) of email addresses
One of the must-haves for email really has to be the ability to look up email
addresses. This section shows how keep an up-to-date cache of the Exchange
server’s Address Book and use it as a query_command in Mutt allowing for
both searching and tab-completion of addresses right from within Mutt.
Fortunately, our company provides an LDAP server and this is what we’ll use. You’ll need to infer what the structure of Organisational Units (OUs) and Domain Components (DCs) are but once you have that you can construct an LDAP query.
Querying the LDAP server
To query the LDAP server, we’ll be using ldapsearch which should be available on most distros. If you’re running Ubuntu you can install it using:
$ sudo apt-get install -y ldap-utils
I wanted to be as broad as possible (and the internal LDAP structure doesn’t make it easy for me to do anything else) so I ended up with a filter like this:
(|(objectClass=person)(objectClass=group))
This filter is pretty obvious: it returns all objects that are either people or groups. Now we need to decide what fields we need. I wanted to keep it simple since Mutt’s tab-complete gives you a line per person. I opted for simply the email address, the name, and the title of the employee.
Now you can make a query like this:
$ ldapsearch -h <host> -p <port> -x -D <uname> -w <pw> -b <base> -LLL -E pr=500/noprompt "(|(objectClass=person)(objectClass=group))" mail cn title
I needed to provide all of the above arguments to ldapsearch to get something
sensible. -x, -D and -w are all for authentication. -b specifies
a sensible search base instead of the default. In my case this was the root
domain of the LDAP server. E.g. if your server is at foo.bar.net, it might
look like dc=bar,dc=net. The -LLL restricts the output to LDIFv1 and
strips the output of metadata. The most important bit for our server was the
last options: -E pr=500/noprompt. Without this I hit a payload limit. This
option paginates the response.
Formatting for consumption by Mutt
The result you get back from the above query is not directly usable with Mutt’s
query_command. According to the External Address Queries section of the
Mutt manual, any query command…
“should return a one line message, then each matching response on a single line, each line containing a tab separated address then name then some other optional information.”
So we add a simple shell script around the ldapsearch query to print the
output in the correct form.
Caching the results for quick lookup
The query can also take quite some time. In a large organisation, it can take up to 30 seconds. For this reason, I’ll capture the output of the above shell script and cache it in a file in my home directory. I do this at midnight each night with the following crontab entry:
0 0 * * * /home/simonbe/.mutt/pull-ldap.sh > /home/simonbe/.mutt/addrs
Now the query_command in Mutt is reduced to a simple grep which makes
tab-completing or searching for addresses complete instantly even for my list
of ~40,000 entries:
set query_command = "echo; grep -i %s ~/.mutt/addrs"
bind editor <Tab> complete-query
Note: The extra echo is because Mutt expects a line of status. Without this,
it would gobble up one of the matching results.
The end result
From within Mutt you can now search for addresses by name using Q (the
default) or you can just start a new message by hitting m (default) and where
it now has a prompt that says To: you can enter part of a name and press
<Tab> and voilà… if there is only one result that matches, it will insert
itself. If there are multiple addresses, you’ll be presented with a list to
choose from.
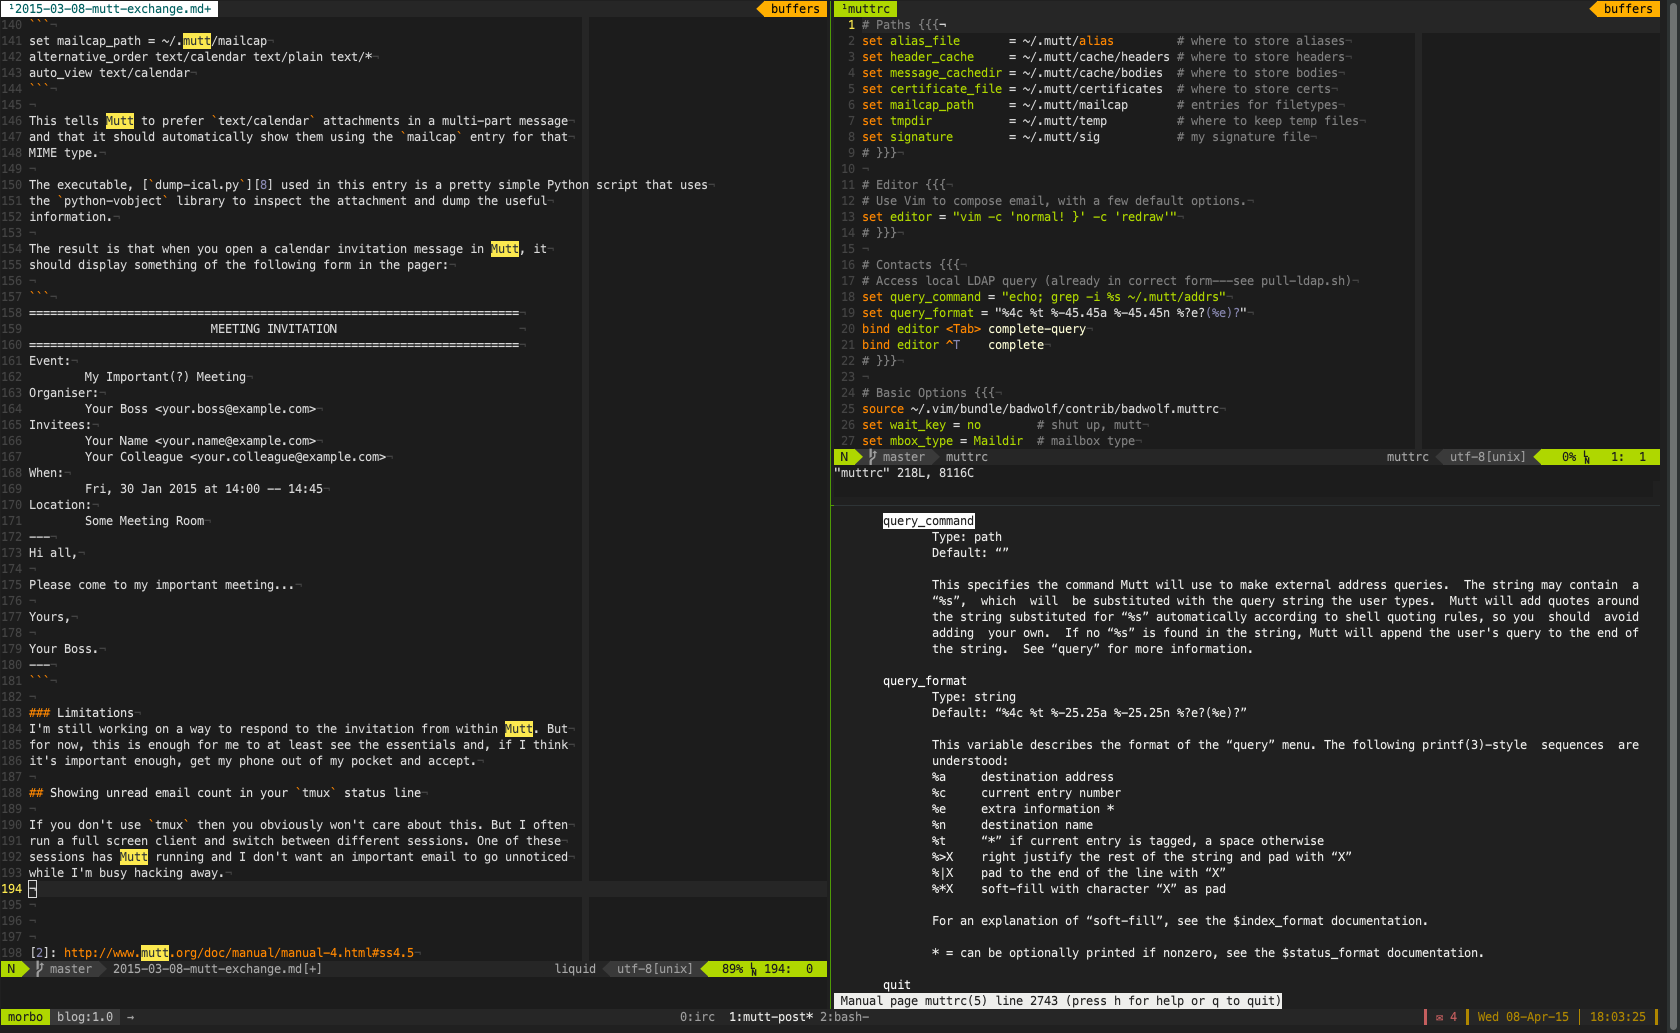
Viewing Exchange calender invitations
One of the things that got annoying quickly was that event invitations would
appear as empty emails with a .ics attachment so I couldn’t see what the
event was. We can solve this with a mailcap entry in your mailcap file:
text/calendar; ~/.mutt/dump-ical.py %s; copiousoutput;
You’ll need to make sure you’ve configured Mutt to use your mailcap
file and to automatically view text/calendar attachments
set mailcap_path = ~/.mutt/mailcap
alternative_order text/calendar text/plain text/*
auto_view text/calendar
This tells Mutt to prefer text/calendar attachments in a multi-part message
and that it should automatically show them using the mailcap entry for that
MIME type.
The executable, dump-ical.py used in this entry is a pretty simple
Python script that uses the python-vobject library to inspect the attachment
and dump the useful information.
The result is that when you open a calendar invitation message in Mutt, it should display something of the following form in the pager:
======================================================================
                          MEETING INVITATION
======================================================================
Event:
        My Important(?) Meeting
Organiser:
        Your Boss <your.boss@example.com>
Invitees:
        Your Name <your.name@example.com>
        Your Colleague <your.colleague@example.com>
When:
        Fri, 30 Jan 2015 at 14:00 -- 14:45
Location:
        Some Meeting Room
---
Hi all,

Please come to my important meeting...

Yours,

Your Boss.
---
Limitations
I’m still working on a way to respond to the invitation from within Mutt. But for now, this is enough for me to at least see the essentials and, if I think it’s important enough, get my phone out of my pocket and accept.
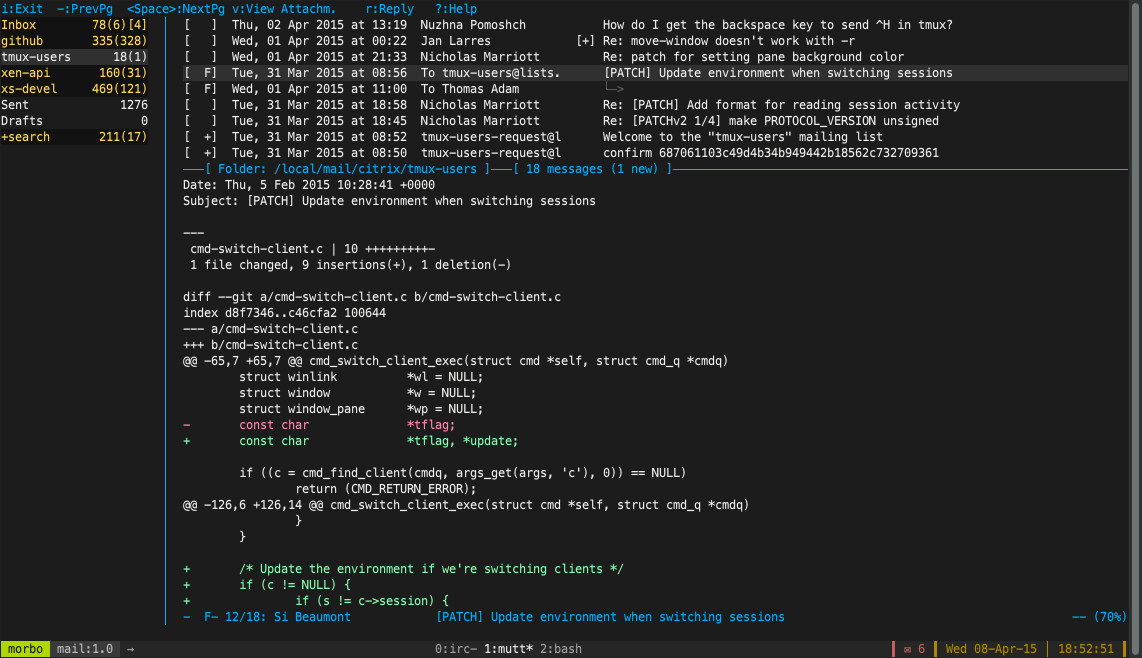
Showing unread email count in your tmux status line
If you don’t use tmux then you obviously won’t care about this. But I often
run a full screen client and switch between different sessions. One of these
sessions has Mutt running and I don’t want an important email to go unnoticed
while I’m busy hacking away.
For this I have simply set my status-right in my tmux.conf to display
new mail (as well as the date and time) as follows:
set -g status-right "#(~/.dotfiles/tmux/new_mail.sh)┃ %a %d-%b-%y │ %H:%M:%S ┃"
which shells out to a simple script to fill in the segment. Because Mutt has been configured to use a local Maildir, the script couldn’t be simpler:
#!/bin/sh

count=$(ls <path-to-maildir>/Inbox/new | wc -l)

if [[ -n "$count"  && "$count" -gt 0 ]]; then
  echo "┃ ✉ ${count} "
fi
This will then render the number of unread emails at the bottom like in this screenshot:
Help yourself…
I like to package up all my configuration so I can roll it out on a new box
easier so this is no different. They’re all in the mutt/ directory of my
.dotfiles Github repo.
Update (2017)
I’ve since made quite some changes to the scripts above. I have moved to
neomutt and have reworked a lot of the LDAP scripts to be more extensible.
All these are still available via the Github link above.
Leave a Reply